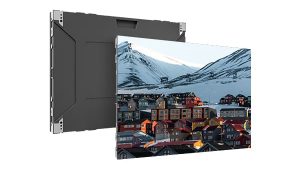
LED displays are known for their vibrant colors, sharp images, and superior performance compared to older display technologies. However, if you’re experiencing a fuzzy or blurry image on your LED display, it can be frustrating, especially when the display is meant to deliver crisp, clear visuals. Fortunately, addressing this issue is often simpler than it seems.
In this guide, we’ll walk you through three easy steps to solve the problem of a fuzzy LED display, whether you’re dealing with a monitor, television, or a commercial digital display. By the end, your screen should return to its full clarity and sharpness.
Step 1: Check the Resolution and Display Settings
One of the most common causes of a fuzzy LED display is incorrect resolution settings. The resolution refers to the number of pixels that make up the image on the screen. If the display resolution doesn’t match the native resolution of your screen, the images can appear stretched, compressed, or blurry. Follow these steps to ensure your display settings are correct:
1.1 Match the Resolution to the Display
Most LED displays have a native resolution, which is the specific resolution they were designed to operate at for optimal clarity. Common resolutions include 1920×1080 (Full HD) or 3840×2160 (4K Ultra HD), but your screen might be different depending on its size and model.
- For PC users:
- Right-click on your desktop and select “Display Settings.”
- Scroll down to the “Resolution” section, where you’ll see the current setting. Change it to the recommended or native resolution of your screen. This option is usually marked as “Recommended” in most operating systems.
- For Mac users:
- Go to “System Preferences” > “Displays.”
- Under “Resolution,” select Scaled, and choose the highest available resolution, which is typically the screen’s native resolution.
- For TV or external monitors:
- If your LED screen is connected to a device like a gaming console, set-top box, or computer, you’ll need to adjust the output resolution of the connected device. For example, with a gaming console like the PlayStation or Xbox, go into the console’s settings menu and choose the resolution that matches your TV or monitor.
1.2 Adjust Display Scaling (If Necessary)
Even if the resolution is set correctly, scaling issues can cause fuzziness, especially on Windows devices. Display scaling is a feature that enlarges or shrinks the size of text, apps, and icons on your screen, which can sometimes distort images if not configured properly.
- Windows scaling:
- In the same “Display Settings” window, look for the “Scale and layout” option.
- Set the scaling to 100% if possible, especially for high-resolution displays (like 4K screens). If the text appears too small at 100%, try other scaling percentages, but be aware that scaling above 125% can cause certain elements to appear blurry.
By ensuring that both the resolution and scaling settings are correct, you’ll eliminate many potential causes of fuzziness on your LED display.
Step 2: Inspect the Connection and Cables
A common but often overlooked cause of fuzzy displays is the quality of the connection between your device and the screen. Whether you’re using an HDMI, DisplayPort, VGA, or another type of cable, an improper or faulty connection can degrade the quality of the video signal, leading to blurry visuals. Follow these steps to check and improve your connections:
2.1 Ensure Cable Quality
- HDMI Cables: If you’re using an HDMI cable, ensure that it’s rated for the resolution you’re trying to display. For example, older HDMI cables might not support 4K resolutions at 60Hz, leading to signal issues. Using a cable that supports HDMI 2.0 or HDMI 2.1 is crucial for 4K or higher displays.
- DisplayPort Cables: For higher refresh rates (like for gaming monitors), make sure you’re using a DisplayPort 1.4 or higher cable for resolutions above Full HD.
- VGA or Older Connections: If you’re using an older connection like VGA, the fuzziness might simply be due to the limitations of the connection. VGA is an analog signal and doesn’t handle high resolutions or crisp digital clarity well. If possible, switch to an HDMI or DisplayPort cable for a significant improvement in image quality.
2.2 Check for Loose Connections
Sometimes, the problem might be as simple as a loose cable. Check both ends of the cable to ensure they’re securely plugged into the appropriate ports. A partially connected cable can lead to poor signal transmission, causing fuzziness or flickering.
- Disconnect the cable and reconnect it firmly to both the screen and the output device (PC, console, etc.).
- If the problem persists, try using a different cable or port to rule out any issues with the cable or input.
2.3 Use the Correct Input Port
Many modern LED displays come with multiple input ports (HDMI 1, HDMI 2, etc.). Some of these ports may be optimized for specific resolutions or refresh rates. For instance, HDMI 2.1 ports on a 4K TV support higher bandwidth, meaning better quality signals for high-resolution content.
- Check your device’s manual to see which port is best for your content.
- If possible, use the highest bandwidth port for 4K or gaming to ensure the best possible image quality.
Step 3: Tweak Advanced Display Settings
If the problem persists after adjusting the resolution and checking the cables, it may be time to dive into your device’s advanced display settings. These settings can include features such as refresh rate, contrast, sharpness, and motion smoothing, all of which can affect how clear or fuzzy your display appears.
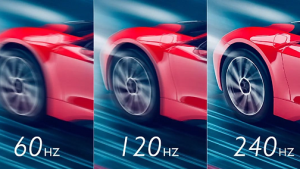
3.1 Adjust the Refresh Rate
The refresh rate of your display refers to how many times the image is refreshed per second (measured in Hertz or Hz). A low refresh rate can make the image look choppy or blurry, especially when watching fast-moving content like sports or playing video games.
- Windows users can adjust the refresh rate by going to “Display Settings” > “Advanced Display Settings” > “Display Adapter Properties.” Under the “Monitor” tab, you’ll find the option to change the refresh rate. Set it to the highest available option (usually 60Hz, 120Hz, or higher for gaming monitors).
- TV users may find refresh rate settings in the TV’s menu under “Picture” or “Advanced Picture Settings.” Set the refresh rate to 60Hz or 120Hz depending on your content.
3.2 Disable Motion Smoothing and Image Enhancement Features
Some LED displays, particularly TVs, come with built-in features designed to enhance picture quality, like motion smoothing, dynamic contrast, and noise reduction. While these features might sound helpful, they can sometimes cause blurriness or make the image appear unnatural.
- Turn off motion smoothing (sometimes called “TruMotion,” “Auto Motion Plus,” or “MotionFlow”) for a clearer picture.
- Reduce or disable any noise reduction or image sharpening settings, as these can create artifacts or blur.
3.3 Calibrate Brightness, Contrast, and Sharpness
Finally, calibrating your display’s brightness, contrast, and sharpness can improve clarity. Overly high sharpness settings can result in artificial edges, making images appear fuzzy, while improper brightness and contrast levels can wash out details.
- Lower sharpness to a more moderate level.
- Adjust brightness and contrast until you find a balance that improves clarity without losing detail.
Conclusion
A fuzzy LED display can be frustrating, but by following these three simple steps—checking resolution settings, ensuring quality connections, and fine-tuning advanced display options—you can quickly resolve the issue and enjoy the crisp, clear image quality your display was designed to deliver. Whether it’s for gaming, movies, or productivity, taking these steps will help restore your display’s full potential.